Hello everyone!
We’ve been hard at work recently to bring us all closer to being able to fully explore the world of Ur. I just pushed live a few changes for the client for your to enjoy.
First, I know that as soon as we started having multiple items for you to carry around, people wanted to be able to do something with them to free up space. Well that’s now a possibility:
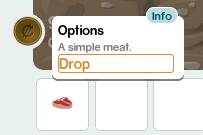
You can drop items directly from your bags onto the ground and someone else can come along and pick it up if they wish. But that’s not enough, you should be able to get some money for your hard work in gathering, right? Well, now you can. If you talk to a street spirit, you’ll now see two tabs, one for buying items and one for selling them:
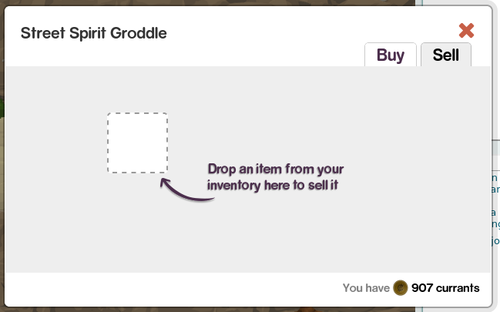
You can drag an item from your inventory and a screen telling you how much it’s worth will display and you can sell it from there. This should feel familiar to you if you remember it from Glitch.
Finally a couple of new items and entities have been added. There are now dirt piles to be dug and you can gather Lumps of Earth and Lumps of Loam (rarely) from them.
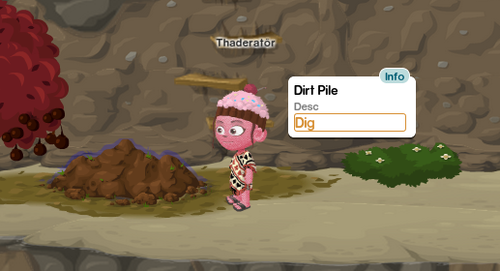
Make sure you talk to a street spirit and buy a shovel!
But is this all I’m writing to you about today? Nope. There’s one more thing I want to introduce you to. You may have wondered in the past “Why is Mira Mesh so full of stuff but none of the other streets are?” Well, I’m going to answer that for you and tell you how we can fill up all the rest of the streets.
When Tiny Speck released their source code and art assets, they gave us quite a mountain of stuff. I’m not sure any other company of their size has ever done that before. But, not everything was included to just put the game on a computer and have it go. One of the missing items was the information of where trees and quoins and other entities went on the streets.
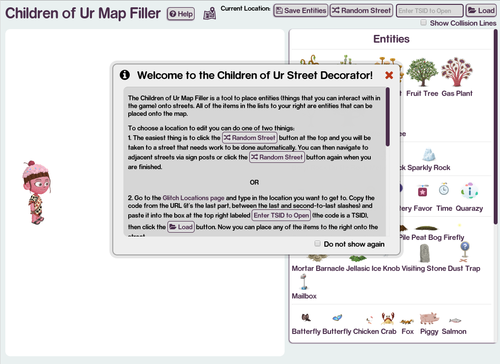
We do, however, know how many of each thing should go on most streets, which is helpful. In order to put all the stuff back, we’ve developed a tool for which I could not come up with a good name, so I’ve called it “Children of Ur Map Filler” (catchy, huh?).
This tool is intended to make it easy to put the entities back on the streets. It was designed so that both we, the developers, and you our very helpful crowd of testers can participate in the process. It is located at
childrenofur.com/mapfiller.
After loading the app, you are presented with a basic set of instructions for use, but I’ll go over it here as well. The first thing you’ll want to do is load a street. This can either be entered manually using the TSID (you can get the TSID here by searching for a street and copying the code that starts with “L” from the url bar) and pressing the “Load” button or by clicking the “Random Street” button. This will load a street into the large white area so that you can edit it.
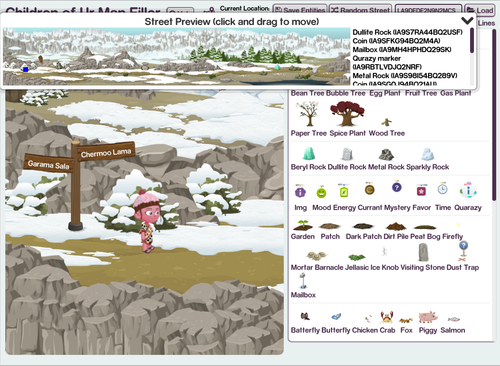
After a street loads, you will see a preview of the entire street in a floating window (you may drag this window around or minimize it if it’s in your way). This preview has a picture of the street in which you can see where things like trees, mailboxes and vendors are supposed to go. Unfortunately none of these pictures include the locations of the quoins, at least none that I’ve come across.
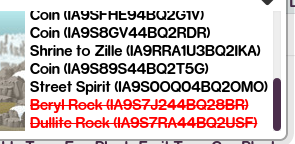
There is also a list of the entities that belong on that street displayed to the right of the preview. Anything that is crossed off and red has already been placed on the street. Anything that is in black still needs to be placed.
Sometimes the preview image can be a little too small to really see where things should go easily. If this is the case, you can double click the image and you’ll be taken to the location page (in another window) so that it might have a larger image. I cannot guarantee this, sorry.
In order to move around the level, we have turned ground collision and gravity off. Basically you’ll just float around by pressing either the WASD keys or by using the arrows. In order to go a bit faster, you can also use the level preview. In the preview image, there is a blue square. This represents where you are in the level. If you (single) click somewhere else in the image, you’ll be taken directly there, no walking needed.
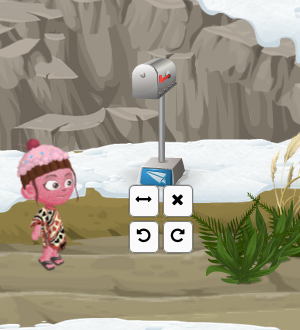
Once you find the location that you want to put an object down on, you simple drag it from the toolbox and drop it onto the map. This will automatically cross the entity off of the list as well. In some cases, you’ll find that the entity might be facing left or right. If you wish to change the way the entity is facing, hover over it with your mouse and 4 buttons will pop up. If you click the one that looks like arrows pointing left and right, the entity will flip horizontally.
You can also delete the entity by pressing the
and rotate it left and right by using the two bottom buttons (probably not be needed in most cases). You can also delete an entity by picking it up again and dragging it back to the toolbox or by picking it up and pressing the delete key on your keyboard.
Once you have finished putting entities on the street, you should click the “Save Entities” button at the top of your screen. This will save the information to the server. The very next time that street is loaded, you’ll be able to see the entities that you’ve put down and interact with them! Don’t worry if we’ve not implemented some (like the mailbox for example). As soon as we do, they will start showing up as well with no extra work.
I think that’s all I have for today. If you have any questions or feedback, please feel free to contact us via our social media accounts.
Thanks for reading!
— Thaderator
 Hello everyone!
We’ve been hard at work recently to bring us all closer to being able to fully explore the world of Ur. I just pushed live a few changes for the client for your to enjoy.
First, I know that as soon as we started having multiple items for you to carry around, people wanted to be able to do something with them to free up space. Well that’s now a possibility:
You can drop items directly from your bags onto the ground and someone else can come along and pick it up if they wish. But that’s not enough, you should be able to get some money for your hard work in gathering, right? Well, now you can. If you talk to a street spirit, you’ll now see two tabs, one for buying items and one for selling them:
Hello everyone!
We’ve been hard at work recently to bring us all closer to being able to fully explore the world of Ur. I just pushed live a few changes for the client for your to enjoy.
First, I know that as soon as we started having multiple items for you to carry around, people wanted to be able to do something with them to free up space. Well that’s now a possibility:
You can drop items directly from your bags onto the ground and someone else can come along and pick it up if they wish. But that’s not enough, you should be able to get some money for your hard work in gathering, right? Well, now you can. If you talk to a street spirit, you’ll now see two tabs, one for buying items and one for selling them:
 You can drag an item from your inventory and a screen telling you how much it’s worth will display and you can sell it from there. This should feel familiar to you if you remember it from Glitch.
Finally a couple of new items and entities have been added. There are now dirt piles to be dug and you can gather Lumps of Earth and Lumps of Loam (rarely) from them.
You can drag an item from your inventory and a screen telling you how much it’s worth will display and you can sell it from there. This should feel familiar to you if you remember it from Glitch.
Finally a couple of new items and entities have been added. There are now dirt piles to be dug and you can gather Lumps of Earth and Lumps of Loam (rarely) from them.
 Make sure you talk to a street spirit and buy a shovel!
But is this all I’m writing to you about today? Nope. There’s one more thing I want to introduce you to. You may have wondered in the past “Why is Mira Mesh so full of stuff but none of the other streets are?” Well, I’m going to answer that for you and tell you how we can fill up all the rest of the streets.
When Tiny Speck released their source code and art assets, they gave us quite a mountain of stuff. I’m not sure any other company of their size has ever done that before. But, not everything was included to just put the game on a computer and have it go. One of the missing items was the information of where trees and quoins and other entities went on the streets.
We do, however, know how many of each thing should go on most streets, which is helpful. In order to put all the stuff back, we’ve developed a tool for which I could not come up with a good name, so I’ve called it “Children of Ur Map Filler” (catchy, huh?).
Make sure you talk to a street spirit and buy a shovel!
But is this all I’m writing to you about today? Nope. There’s one more thing I want to introduce you to. You may have wondered in the past “Why is Mira Mesh so full of stuff but none of the other streets are?” Well, I’m going to answer that for you and tell you how we can fill up all the rest of the streets.
When Tiny Speck released their source code and art assets, they gave us quite a mountain of stuff. I’m not sure any other company of their size has ever done that before. But, not everything was included to just put the game on a computer and have it go. One of the missing items was the information of where trees and quoins and other entities went on the streets.
We do, however, know how many of each thing should go on most streets, which is helpful. In order to put all the stuff back, we’ve developed a tool for which I could not come up with a good name, so I’ve called it “Children of Ur Map Filler” (catchy, huh?).
 This tool is intended to make it easy to put the entities back on the streets. It was designed so that both we, the developers, and you our very helpful crowd of testers can participate in the process. It is located at childrenofur.com/mapfiller.
After loading the app, you are presented with a basic set of instructions for use, but I’ll go over it here as well. The first thing you’ll want to do is load a street. This can either be entered manually using the TSID (you can get the TSID here by searching for a street and copying the code that starts with “L” from the url bar) and pressing the “Load” button or by clicking the “Random Street” button. This will load a street into the large white area so that you can edit it.
This tool is intended to make it easy to put the entities back on the streets. It was designed so that both we, the developers, and you our very helpful crowd of testers can participate in the process. It is located at childrenofur.com/mapfiller.
After loading the app, you are presented with a basic set of instructions for use, but I’ll go over it here as well. The first thing you’ll want to do is load a street. This can either be entered manually using the TSID (you can get the TSID here by searching for a street and copying the code that starts with “L” from the url bar) and pressing the “Load” button or by clicking the “Random Street” button. This will load a street into the large white area so that you can edit it.
 After a street loads, you will see a preview of the entire street in a floating window (you may drag this window around or minimize it if it’s in your way). This preview has a picture of the street in which you can see where things like trees, mailboxes and vendors are supposed to go. Unfortunately none of these pictures include the locations of the quoins, at least none that I’ve come across.
 There is also a list of the entities that belong on that street displayed to the right of the preview. Anything that is crossed off and red has already been placed on the street. Anything that is in black still needs to be placed.
Sometimes the preview image can be a little too small to really see where things should go easily. If this is the case, you can double click the image and you’ll be taken to the location page (in another window) so that it might have a larger image. I cannot guarantee this, sorry.
In order to move around the level, we have turned ground collision and gravity off. Basically you’ll just float around by pressing either the WASD keys or by using the arrows. In order to go a bit faster, you can also use the level preview. In the preview image, there is a blue square. This represents where you are in the level. If you (single) click somewhere else in the image, you’ll be taken directly there, no walking needed.
There is also a list of the entities that belong on that street displayed to the right of the preview. Anything that is crossed off and red has already been placed on the street. Anything that is in black still needs to be placed.
Sometimes the preview image can be a little too small to really see where things should go easily. If this is the case, you can double click the image and you’ll be taken to the location page (in another window) so that it might have a larger image. I cannot guarantee this, sorry.
In order to move around the level, we have turned ground collision and gravity off. Basically you’ll just float around by pressing either the WASD keys or by using the arrows. In order to go a bit faster, you can also use the level preview. In the preview image, there is a blue square. This represents where you are in the level. If you (single) click somewhere else in the image, you’ll be taken directly there, no walking needed.
 Once you find the location that you want to put an object down on, you simple drag it from the toolbox and drop it onto the map. This will automatically cross the entity off of the list as well. In some cases, you’ll find that the entity might be facing left or right. If you wish to change the way the entity is facing, hover over it with your mouse and 4 buttons will pop up. If you click the one that looks like arrows pointing left and right, the entity will flip horizontally.
You can also delete the entity by pressing the and rotate it left and right by using the two bottom buttons (probably not be needed in most cases). You can also delete an entity by picking it up again and dragging it back to the toolbox or by picking it up and pressing the delete key on your keyboard.
Once you have finished putting entities on the street, you should click the “Save Entities” button at the top of your screen. This will save the information to the server. The very next time that street is loaded, you’ll be able to see the entities that you’ve put down and interact with them! Don’t worry if we’ve not implemented some (like the mailbox for example). As soon as we do, they will start showing up as well with no extra work.
I think that’s all I have for today. If you have any questions or feedback, please feel free to contact us via our social media accounts.
Thanks for reading!
Once you find the location that you want to put an object down on, you simple drag it from the toolbox and drop it onto the map. This will automatically cross the entity off of the list as well. In some cases, you’ll find that the entity might be facing left or right. If you wish to change the way the entity is facing, hover over it with your mouse and 4 buttons will pop up. If you click the one that looks like arrows pointing left and right, the entity will flip horizontally.
You can also delete the entity by pressing the and rotate it left and right by using the two bottom buttons (probably not be needed in most cases). You can also delete an entity by picking it up again and dragging it back to the toolbox or by picking it up and pressing the delete key on your keyboard.
Once you have finished putting entities on the street, you should click the “Save Entities” button at the top of your screen. This will save the information to the server. The very next time that street is loaded, you’ll be able to see the entities that you’ve put down and interact with them! Don’t worry if we’ve not implemented some (like the mailbox for example). As soon as we do, they will start showing up as well with no extra work.
I think that’s all I have for today. If you have any questions or feedback, please feel free to contact us via our social media accounts.
Thanks for reading!